
Missed the first part of this mini-blog series? Read it here.
Creating a calculation view in SAP HANA Studio:
Part two of this mini-blog series will briefly outline the process of building a graphical calculation view in SAP HANA Studio and SAP Web IDE for SAP HANA. We are assuming that many readers are familiar with this process and we will therefore not go into too much detail. You can find more information on how to create calculation views here.
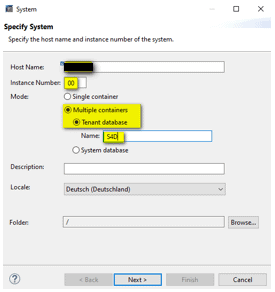
Before creating a calculation view, you will need to ensure that you have established a connection to the tenant database in HANA Studio. To do this, click on the icon highlighted in yellow below.
Enter the following information in the prompt screen:
- Host: __
- Instance __
- Mode: “Multiple containers
- Tenant database: __
Now that we have established a connection with the database, we can create a basic calculation view. To do this, navigate to your package for your user, right click on it and select “Calculation View”.
Choosing a calculation view requires that you have at least one measure defined in the semantics node. If this is not the case, the calculation view will not successfully activate. Measures can be identified by the symbol ![]() in the semantics node.
in the semantics node.
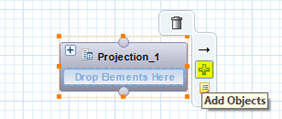
Begin dragging the nodes into the grid that you require for your calculation view. To add a data source to a node (e.g. a table), click on the plus symbol.
Remember to propagate the fields you require from each node to the semantics node.
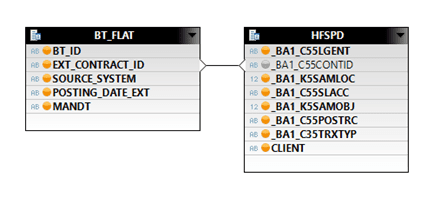
In this example, we created projections on two tables, the “/BA1/F2_BT_FLAT” (Business Transactions) and “/BA1/HFSPD” (subledger data). These tables were joined using an inner join on the field external contract ID.
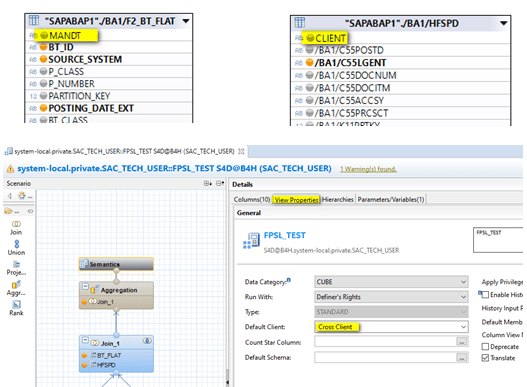
Before activating the calculation view, set the default client to “cross client” in the semantics node under “view properties”. Many SAP tables are cross client, meaning that a user may not be able to see certain records based on their assigned client. Assigning the default client to “cross client” means that the values in the tables used in the calculation view will not be filtered against the client.
Once the calculation view has been successfully activated, check the raw data tab to ensure that the calculation view is outputting data. If this is the case, the calculation view can be used as a data source in SAC.
Now we will demonstrate the same process in SAP Web IDE for SAP HANA.
Creating a calculation view in SAP Web IDE for SAP HANA:
Due to the new architecture of SAP HANA 2.0, building a calculation view in SAP Web IDE for SAP HANA is a little different than in SAP HANA Studio. Users will have to be assigned to a space (system) and will need to create their own workspace inside that space in which they can create a project. Design-time artifacts such as calculation views are created in HANA Database Modules (HDB) and are stored on a Git repository server. Instead of activating your design-time files like on SAP HANA Studio, you build the HDB module inside your project and deploy the mtar file. A HANA Deployment Infrastructure (HDI) container will be created which contains your run-time artifacts. These containers are fully isolated from one another. More information on HDI containers can be found here.
In the example below, we will create a calculation view in a local container on a FSDM development space. However, because the data model for FSDM is stored in another container, we will need to establish a connection between this container and our local container. If the tables you require are in the same HDI container, you can ignore this step.
To read data from another HDI container, we will need the following:
- hdbgrants file
- synonym
- HDI service
A .hdbgrants file grants the roles that your local container will require in order to access the data in another container. To find out which roles you require, add the container with the tables you want to access in the database explorer and navigate to “public synonyms. Search for the table “Roles” and open the data.
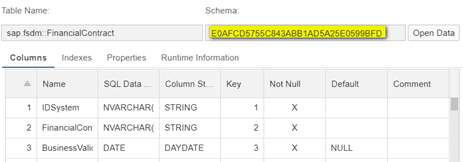
Filter the roles for the schema which you are interested in. The schema for a specific table can be found by opening the meta data for that table in the database explorer. In this case we want to access the table “sap.fsdm::FinancialContract” which is stored in the schema E0AFCD5755C843ABB1AD5A25E0599BFD as shown in the screenshot below.
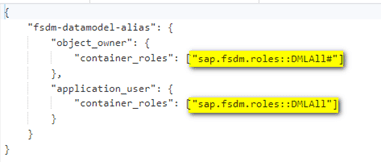
We can assign the appropriate roles to the container based on the access rights. In this case we assign the DMLALL and DMLALL# to our local container (read and write).
Create a .hdbgrant file by right clicking on your HDB module and selecting new database artifact. The syntax should look similar to that in the screenshot below.
The “fsdm-datamodel-alias” refers to the target container that we are trying to access. This needs to be identical to the key specified in the mta.yaml file. The grant file that we create will be referenced by the mta.yaml file when building the project.
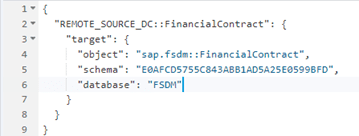
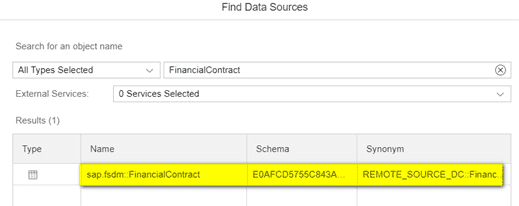
The next step is to create a synonym which is a reference to a specific object in the target HDI container. In this case we want to reference the table sap.fsdm::FinancialContract. If you wanted to add additional tables, you can add these in the same synonym file.
Make sure to reference your name space correctly i.e. “<namespace>::<table>”. The name space is automatically created when you create the HDB module for you project. It has the file type .hdinamespace.
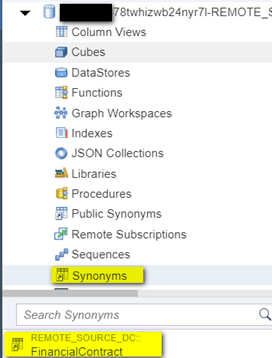
You can find the synonyms that you create in your local container in the database explorer under “Synonyms.”.
The last step is to adjust the mta.yaml file for your project. There are two ways to do this:
- The easiest way is to right click on your HDB module, click on “New” -> “Add External SAP HANA Service” and select “HDI Container.” A list of all HDI services will be displayed. Select the required HDI service that you want to configure (i.e. the target container) and click on finish. This process will automatically adjust the mta.yaml file.
- Open the mta.yaml file directly by right clicking on it and selecting “Open Code Editor” and adjust the file manually.
Once you have successfully built your HDB module you can begin creating a calculation view. Begin by dragging the nodes into the grid that you require for your calculation view. To add a data source to a node (e.g. a table), click on the plus symbol.
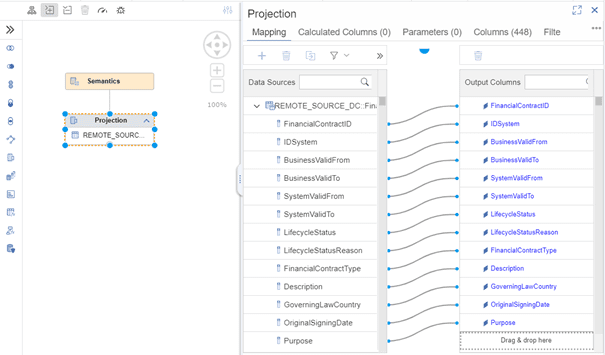
In this example, we have created a calculation view of type “Dimension” (i.e. no measures) using a projection node. The data source of the projection node is the table “sap.fsdm::FinancialContract” for which we created the synonym for.
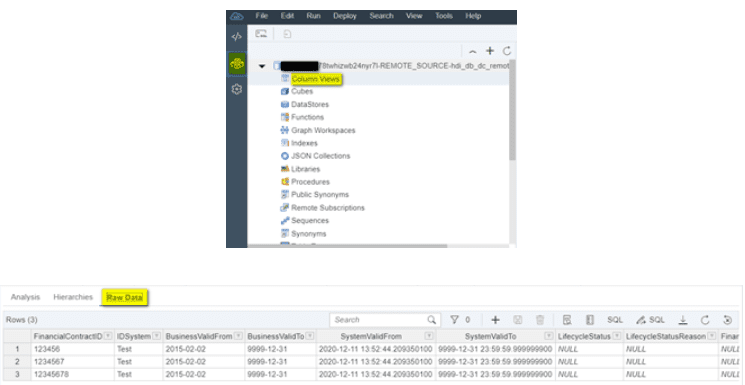
Once the calculation view has been successfully built, check the raw data tab to ensure that the calculation view is outputting data. If this is the case, the calculation view can be used as a data source in SAC. If you have not already added your container to the database explorer you will need to add it before you can access your calculation view.
Daniel Corry is a consultant in the Data Management consulting area. His areas of expertise are SAP HANA, SAP FSDM and SAP Analytics Cloud.









0 Comments